Direct Flush is an infrared sensor controlled mains-flushing urinal valve. The Direct Flush automatically flushes the individual urinal after use, ensuring the highest level of hygiene from the minimum volume of water. The cost-effective solution to maximise urinal hygiene and water economy, Direct Flush removes the need for the auto-flush cistern and associated plumbing used in traditional urinal installations, which flush all urinals intermittently even if they have not all been used.
Direct Flush includes an integral DC pipe interrupter (air gap), enabling the installer to connect it directly to the mains water supply. This provides fluid category 5 back-siphonage protection, without the need for any additional backflow prevention or check valves.
Direct Flush can be powered by either mains electricity via the DC transformer or batteries; both options are included as standard. When batteries are fitted the Direct Flush provides a low battery warning indicator.
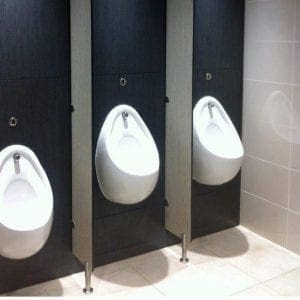
Direct Flush Discreet is ideal for mains-fed urinal flushing applications where rear access can be gained to the wall cavity for servicing and inspection. The valve is mounted on to the pipework behind the panel or wall together with either the mains supply unit or batteries, while the neat and unobtrusive infrared sensor is installed directly above the urinal bowl.

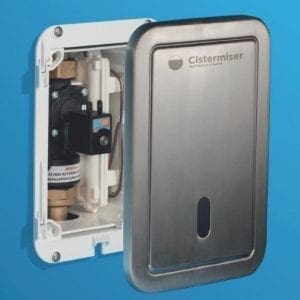
Direct Flush Accessible is an alternative model which incorporates the valve and the power options as well as the infrared sensor in a single compact box housing. It can be installed on to either a concealed structural wall / frame or on to the exposed wall panel. It is ideal where access cannot be gained to the wall cavity. The Brushed Chrome sensor fascia plate can be removed to enable servicing of the valve or battery replacement (if battery powered) in the installed position without the need to remove the panel.
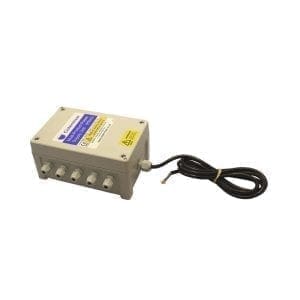
A Multiple-Product Power Supply Unit (PSUC) which powers up to 20 Direct Flush urinal valves is also available as an optional specification. Only 1 fused spur is required when using this product.
Additional customised washroom settings are obtainable via a hand-held remote control Infrared Configuration Unit (ICU) which is available as an optional extra. The remote controller enables rapid automatic range configuration to the specific washroom dimensions, deactivation of the hygiene flush function and, where a siphonic trap has been fitted, activation of the trap refill function.

The Direct Flush infrared sensor detects the user at the urinal bowl and flushes 2 seconds after the user departs. The LED flashes green every 3 seconds whilst a user is detected. If a user is detected whilst the water is flushing, the flush is automatically arrested to prevent splashing and wastage. During the flush, the LED flashes green once a second.
The flush duration is adjustable which ensures that only the minimum amount of water necessary is used.
If there has been no use of the urinal for 12 hours, the Direct Flush automatically runs a hygiene flush to prevent odours and the build-up of uric acid in the pipework.
Direct Flush Accessible provides convenient access to the flushing solenoid valve and connections, via removal of the fascia plate with integral infrared sensor:
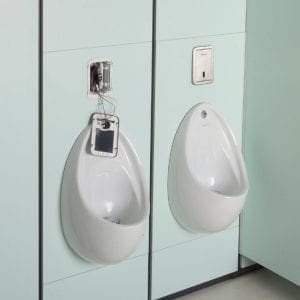
Direct Flush Discreet presents a minimalist design aesthetic with only the infrared sensor visible in the washroom, with the concealed flushing solenoid valve and connections all installed behind decorative wall panels:
Here is a selection of documents, designed to ease specification and installation:
BIM objects are available for download from the NBS National BIM Library, in both Revit and IFC formats.
Click here to view Cistermiser products on the National BIM Library
Parts only warranty (no labour) for equipment purchased in the United Kingdom, Ireland, Isle of Man and the Channel Islands. Components of the unit which are proven to be faulty or defective in manufacture will be exchanged or repaired.
1 Year from Date of Manufacture
3 Years from Date of Installation
To register and qualify for Extended Warranty cover, the Cistermiser product must be correctly installed with the Commissioning Checklist fully completed as itemised in the Installation Guide (included with the product), to demonstrate compliance with the product installation instructions.
Each Commissioning Checklist activity should be dated and additional warranty details provided to enable registration: product serial number, installation date, installation site address and the installer’s name and contact details.
Extended Warranty can be registered online (via the Warranty section of this website) or by completing and returning the Commissioning Checklist from the Installation Guide (included with the product) to this address: Cistermiser Ltd, Unit 1, Woodley Park Estate, 59-69 Reading Road, Woodley, Berkshire RG5 3AN.
Things to check:
Solution: Make sure the power supply is connected. If the mains power is being used through the mains adaptor then check that the mains adaptor is working by reverting to the battery pack. Remove the mains adaptor when using batteries. If the sensor has been deactivated by the anti-vandal feature (because the sensor has detected a presence for more than 30 minutes), then disconnect the power for 2 minutes.
Solution: This is occurring due to low power, so replace the batteries. If operated by mains power, then contact Cistermiser on 0118 969 1611 for advice.
Solution: Ensure the water supply is reaching the valve and you have good working pressure (min 0.5 – max 6 bar). There may be a blockage, so ensure that the filter on the inlet side of the valve is clear.
Things to check:
Solution: First ensure that the power supply or batteries are functioning correctly. Then check all electrical connections.
Solution: Ensure that the water pressure is not below 0.5 bar or above the maximum working pressure of 6 bar. Ensure that the arrow on the valve is pointing in the direction of the water flow.
This problem may be due to debris or scale in the diaphragm. So isolate the water supply to the valve and remove the wires attached to the solenoid. Then undo the 4 x screws and remove. This will give you access to the diaphragm (note the orientation of the diaphragm when reinstalling). Flush under cold water and visually inspect. Re-install. Do not open too many times and discard any plastic swarf.
If the diaphragm has been damaged by debris, carry out the procedure outlined above for removing debris or scale in diaphragm, visually inspect and then contact Cistermiser on 0118 969 for further instructions.
Things to check:
Solution: Water may overflow from the DC pipe interrupter if the sparge pipe outlet or pipe run leading to the sparge is too restrictive. This may also occur if there are too many bends in the pipework. To avoid overflowing, install a free-flowing low restriction sparge. Install the DC pipe interrupter and valve as high as possible and use as long a pipe run between the pipe interrupter and the sparge as possible. Select the appropriate flow regulator colour-coded Brown (3 litres per minute), Grey (4 litres per minute) or Yellow (5 litres per minute) to match the flow through the urinal sparge provided. Use a large pipe size in the pipework between the DC pipe interrupter and the sparge. Minimise pipe bends between the DC pipe interrupter and the sparge.
Things to check:
Solution: Some urinal bowls are not designed for the high pressure of mains water supplies and splashing may occur. In such cases a pressure reducing valve (not supplied) is required on the supply side of the Cistermiser valve to reduce the pressure as necessary. Flow regulators are included to control the flow of water into the urinal systems, colour-coded Brown (3 litres per minute), Grey (4 litres per minute) and Yellow (5 litres per minute).
Things to check:
Solution: This may be due to faulty wiring, so check the wiring carefully. It could also be due to a faulty solenoid so contact Cistermiser on 0118 969 1611 for advice.
Solution: This may be due to low battery power, so replace the batteries. If the unit is operated by mains electricity then call Cistermiser for advice.
Solution: This may be due to the sensor being covered or heavily scratched. Uncover the sensor or polish out scratches.
Not found the answers to what you’re looking for? We’re here to help!
Whether you need help with product support or installation advice, our dedicated support staff are on hand today.
