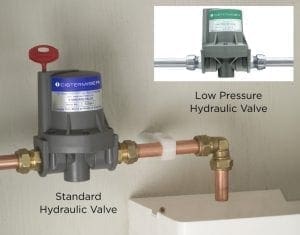
The Hydraulic Control Valve is an automatic urinal flush control valve. The valve uses a unique and simple mechanism which prevents water waste by ensuring that the auto-flush cistern is only filled, and can only flush, when the washroom is used.

The Cistermiser Hydraulic Control Valve consists of three main elements:
The installer or user can adjust the time the valve remains open and therefore how long the cistern takes to fill and how much water is used. When the washroom is not being used the water supply pressure remains constant and the valve remains closed, preventing water passing into the cistern.
The cistern can therefore only flush during periods when the washroom is in use, eliminating unnecessary water consumption and cost.
Two types of Hydraulic Control Valve are available:
For use in buildings where the washrooms are vacant for long periods, an optional Hygiene Flush Attachment is available to ensure a regular flush cycle every 12 hours to prevent washroom odours. The bypass screw should be set to permit a slow drip into the cistern to initiate a flush approximately every 12 hours. For correct operation it is essential that the siphon of the auto flushing cistern does not leak.
The Cistermiser Hydraulic Control Valve is installed on the supply pipe to the urinal cistern. The valve is activated by short-term pressure drops created by use of taps or WCs on the same supply. The valve is normally closed; when it is activated it opens and water passes to the urinal cistern until the pressures on both sides of the diaphragm are equalised. When the cistern is full, the auto-siphon will flush.
Here is a selection of documents, designed to ease specification and installation:
BIM objects are available for download from the NBS National BIM Library, in both Revit and IFC formats.
Click here to view Cistermiser products on the National BIM Library
Parts only warranty (no labour) for equipment purchased in the United Kingdom, Ireland, Isle of Man and the Channel Islands. Components of the unit which are proven to be faulty or defective in manufacture will be exchanged or repaired.
1 Year from Date of Manufacture
3 Years from Date of Installation
To register and qualify for Extended Warranty cover, the Cistermiser product must be correctly installed with the Commissioning Checklist fully completed as itemised in the Installation Guide (included with the product), to demonstrate compliance with the product installation instructions.
Each Commissioning Checklist activity should be dated and additional warranty details provided to enable registration: product serial number, installation date, installation site address and the installer’s name and contact details.
Extended Warranty can be registered online (via the Warranty section of this website) or by completing and returning the Commissioning Checklist from the Installation Guide (included with the product) to this address: Cistermiser Ltd, Unit 1, Woodley Park Estate, 59-69 Reading Road, Woodley, Berkshire RG5 3AN.
Things to check:
Solution: Remove the valve and fit with arrow (located at the base of the valve) in the direction of the water flow.
Solution: Purchase a valve that is suitable for your water pressure.
Solution: Change the pipework or change the valve to a Cistermiser IRC which can be powered by either batteries or mains electricity.
Things to check:
Solution: Ensure that the water supply is turned on and is reaching the valve.
Solution: The pipework after the valve should have no other valves or petcocks fitted and should be open ended. Anything that has been fitted after the valve can cause back pressure which will stop the valve from opening.
Solution: Change the pipework or change the valve to a Cistermiser IRC which can be powered by either batteries or mains electricity.
Solution: Change the valve to one that is suitable for the water pressure on site.
Solution: The valve does need to be vented as per the commissioning instructions – trapped air will cause a malfunction.
Solution: The restrictor screw should be approx. 3.5 turns STD and LP (Low Pressure) valves and 2 turns for HSLP (High Sensitivity Low Pressure) valves below the level of the main valve on initial installation (not flush or across the valve body).
Solution: Unscrew the brass cap then turn the screw anti-clockwise to increase the sensitivity.
Solution: Change the pipework or change the valve to a Cistermiser IRC which can be powered by either batteries or mains electricity.
Solution: If possible move the valve/draw-off point closer together. Change the pipework or change the valve to a Cistermiser IRC which can be powered by either batteries or mains electricity.
Solution: Purchase a Cistermiser IRC valve which does not rely on pressure drops and can be powered by either batteries or mains electricity.
Solution: Install a Cistermiser IRC.
Things to check:
Solution: Turn the restrictor screw clockwise to increase the volume of water allowed through with each activation of the valve and anti-clockwise to decrease. If this has no effect then a Cistermiser IRC valve, which does not rely on pressure drops, should be installed. The IRC can be powered by either batteries or mains electricity.
Things to check:
Solution: Remove the pipework from the outlet side of the valve, put your thumb over the outlet and activate the draw-off. If you feel a slight suction there may be a fault with the valve and you should contact Cistermiser Ltd. Call our Customer Services Team on 0118 969 1611 for advice.
Solution: The leak is coming from the join with the pipework. The bonded seal may have slipped out during the installation. Ensure that the bonded seal is fitted before tightening pipework.
Not found the answers to what you’re looking for? We’re here to help!
Whether you need help with product support or installation advice, our dedicated support staff are on hand today.
